aster.cloud aster.cloud
  • /
  • Platforms
    • Public Cloud
    • On-Premise
    • Hybrid Cloud
    • Data
  • Architecture
    • Design
    • Solutions
    • Enterprise
  • Engineering
    • Automation
    • Software Engineering
    • Project Management
    • DevOps
  • Programming
    • Learning
  • Tools
  • About
  • /
  • Platforms
    • Public Cloud
    • On-Premise
    • Hybrid Cloud
    • Data
  • Architecture
    • Design
    • Solutions
    • Enterprise
  • Engineering
    • Automation
    • Software Engineering
    • Project Management
    • DevOps
  • Programming
    • Learning
  • Tools
  • About
aster.cloud aster.cloud
  • /
  • Platforms
    • Public Cloud
    • On-Premise
    • Hybrid Cloud
    • Data
  • Architecture
    • Design
    • Solutions
    • Enterprise
  • Engineering
    • Automation
    • Software Engineering
    • Project Management
    • DevOps
  • Programming
    • Learning
  • Tools
  • About
code
  • Engineering
  • Programming
  • Software Engineering

Using A Subflow In Dialogflow CX

  • aster.cloud
  • January 13, 2022
  • 4 minute read

One of the best practices of software development is to refactor common code into modules and then use it across your application. A key feature of Dialogflow CX is to ensure that multiple teams are able to work on complex agents. This will require that it supports reuse of common functionality across flows, not just in a single agent but even across agents.

In this blog post, we are going to take a look at how to use a Subflow while designing a Dialogflow CX Agent. Think of a subflow as some common functionality that you would like to utilize in one or more flows.


Partner with aster.cloud
for your next big idea.
Let us know here.


From our partners:

CITI.IO :: Business. Institutions. Society. Global Political Economy.
CYBERPOGO.COM :: For the Arts, Sciences, and Technology.
DADAHACKS.COM :: Parenting For The Rest Of Us.
ZEDISTA.COM :: Entertainment. Sports. Culture. Escape.
TAKUMAKU.COM :: For The Hearth And Home.
ASTER.CLOUD :: From The Cloud And Beyond.
LIWAIWAI.COM :: Intelligence, Inside and Outside.
GLOBALCLOUDPLATFORMS.COM :: For The World's Computing Needs.
FIREGULAMAN.COM :: For The Fire In The Belly Of The Coder.
ASTERCASTER.COM :: Supra Astra. Beyond The Stars.
BARTDAY.COM :: Prosperity For Everyone.

Sample Agent utilizing a Subflow

We will utilize an existing Agent that has been made available for download here. Go ahead and restore the sample Agent into an Agent project following the steps given over here. Once you have restored the agent, you should be able to see the sample flow that is shown below:


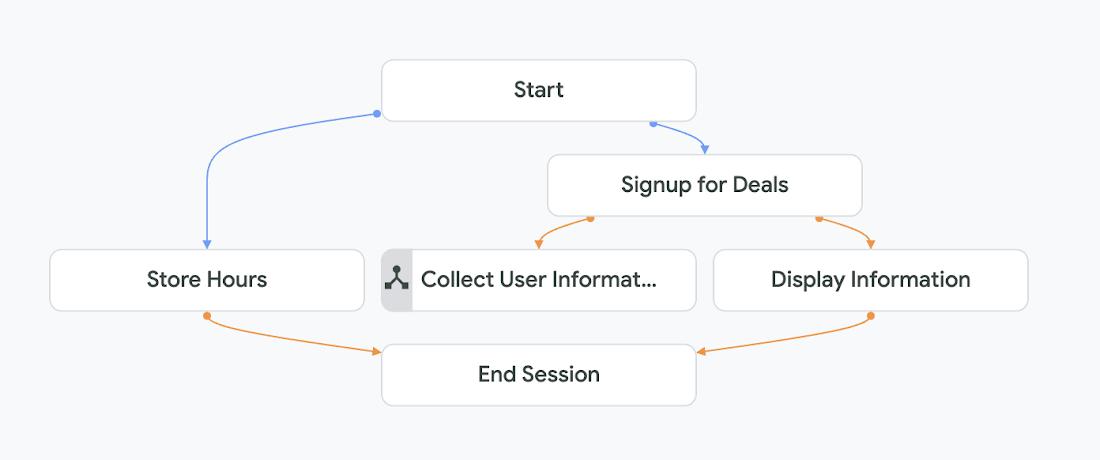
The Sample agent has our default flow and the agent currently supports queries in two different areas:

  • Get Information on Store Hours
  • Sign up for Deals

You can try out the Agent by using the Test Agent feature in Dialogflow CX console with the following phrases:

  • What are the store hours? (Store Hours page)
  • Are there any deals currently on? (Signup for Deals page)

Understanding the Subflow

Our interest in this blog post, will be on the Signup for Deals page that allows users to sign up for receiving deals on their email address. You will notice that there is a subflow Collect User Information, that is being invoked by one of the routes from Signup for Deals page. Let us take a look at this flow, which is shown below:

Read More  How MEDITECH Adds Advanced Security To Its Cloud-Based Healthcare Solutions With Cloud IDS


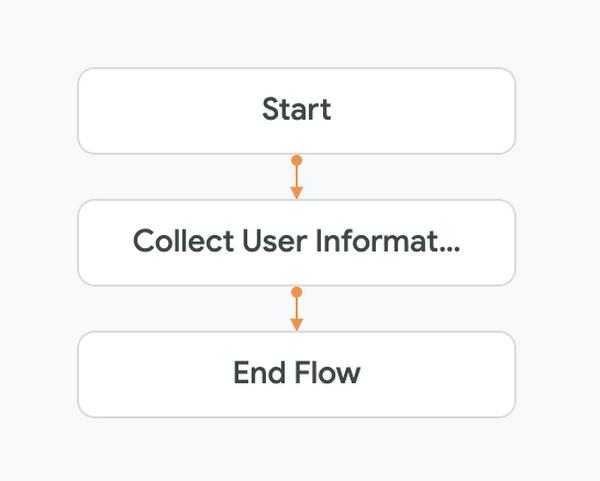
This subflow captures three inputs (parameters) from the user:

  • First Name
  • Last Name
  • Email Address

This is evident from the Collect User Information page and the parameter settings as shown below:


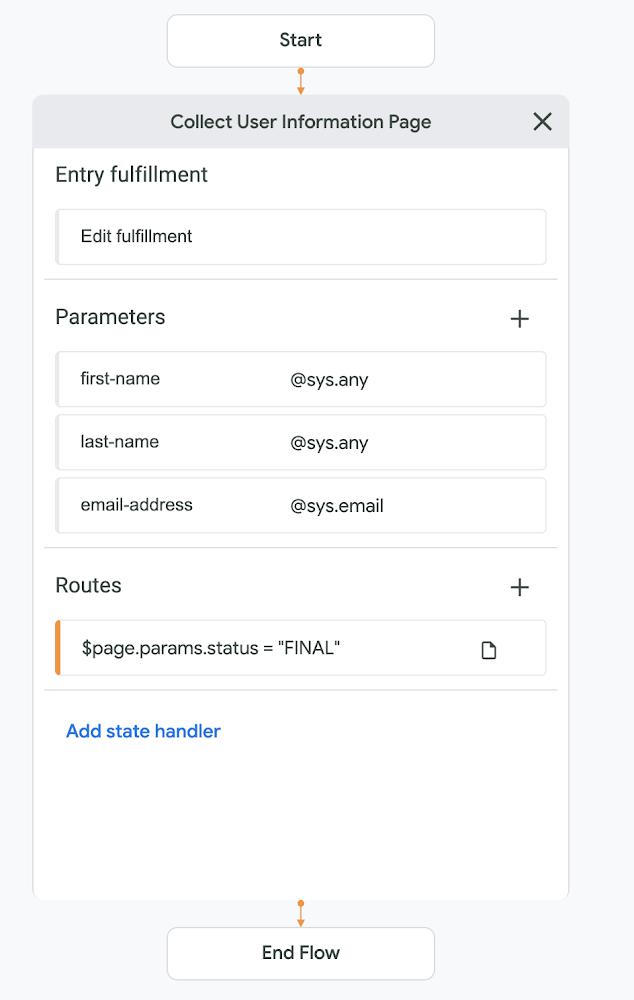
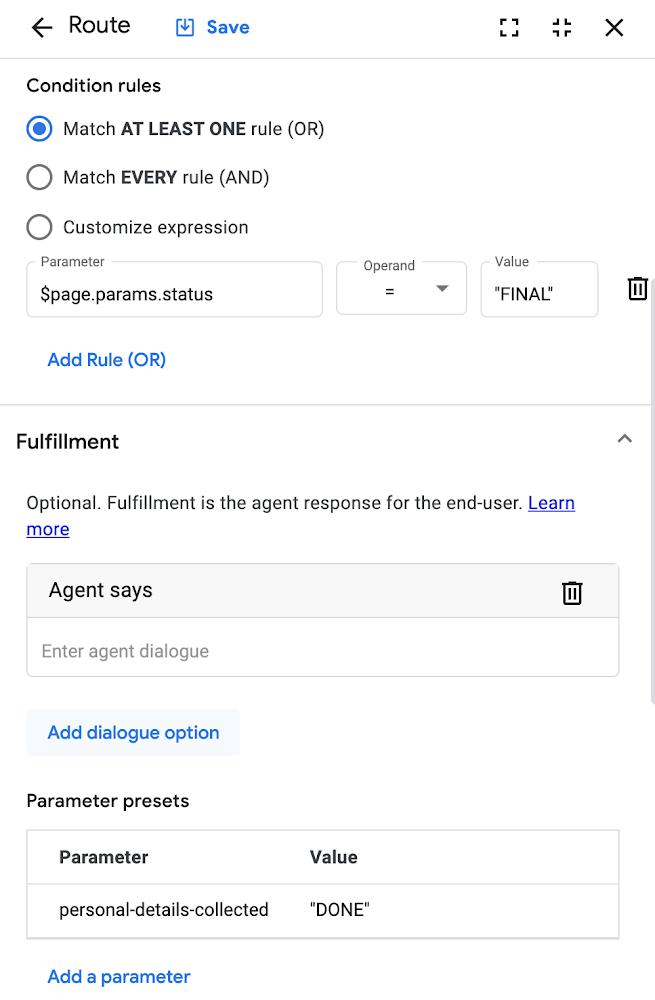
Additionally, we have a Route setup from this page that fires if the parameters (all of them are mandatory) have been captured and when that happens, we set a parameter personal-details-collected to “DONE” and end this flow, as shown below:


You can think of this subflow as a common piece of functionality that you might require in more scenarios across this Agent or in other projects. We do not want to reinvent the wheel and script this every time that we need to capture these common parameters from the user.

In essence, we are going to call the Collect User Information flow, which captures the parameters and then the parameters will need to be read in the Default Start flow, which is the parent flow.

Understanding Parent Flow

Now that we have looked at the subflow, the Parent Flow should be easy to understand. You noticed in the earlier section that we set a parameter personal-details-collected to “DONE”. So just before we transition to the subflow, the Signup for Deals page sets the parameter to PENDING as shown below.


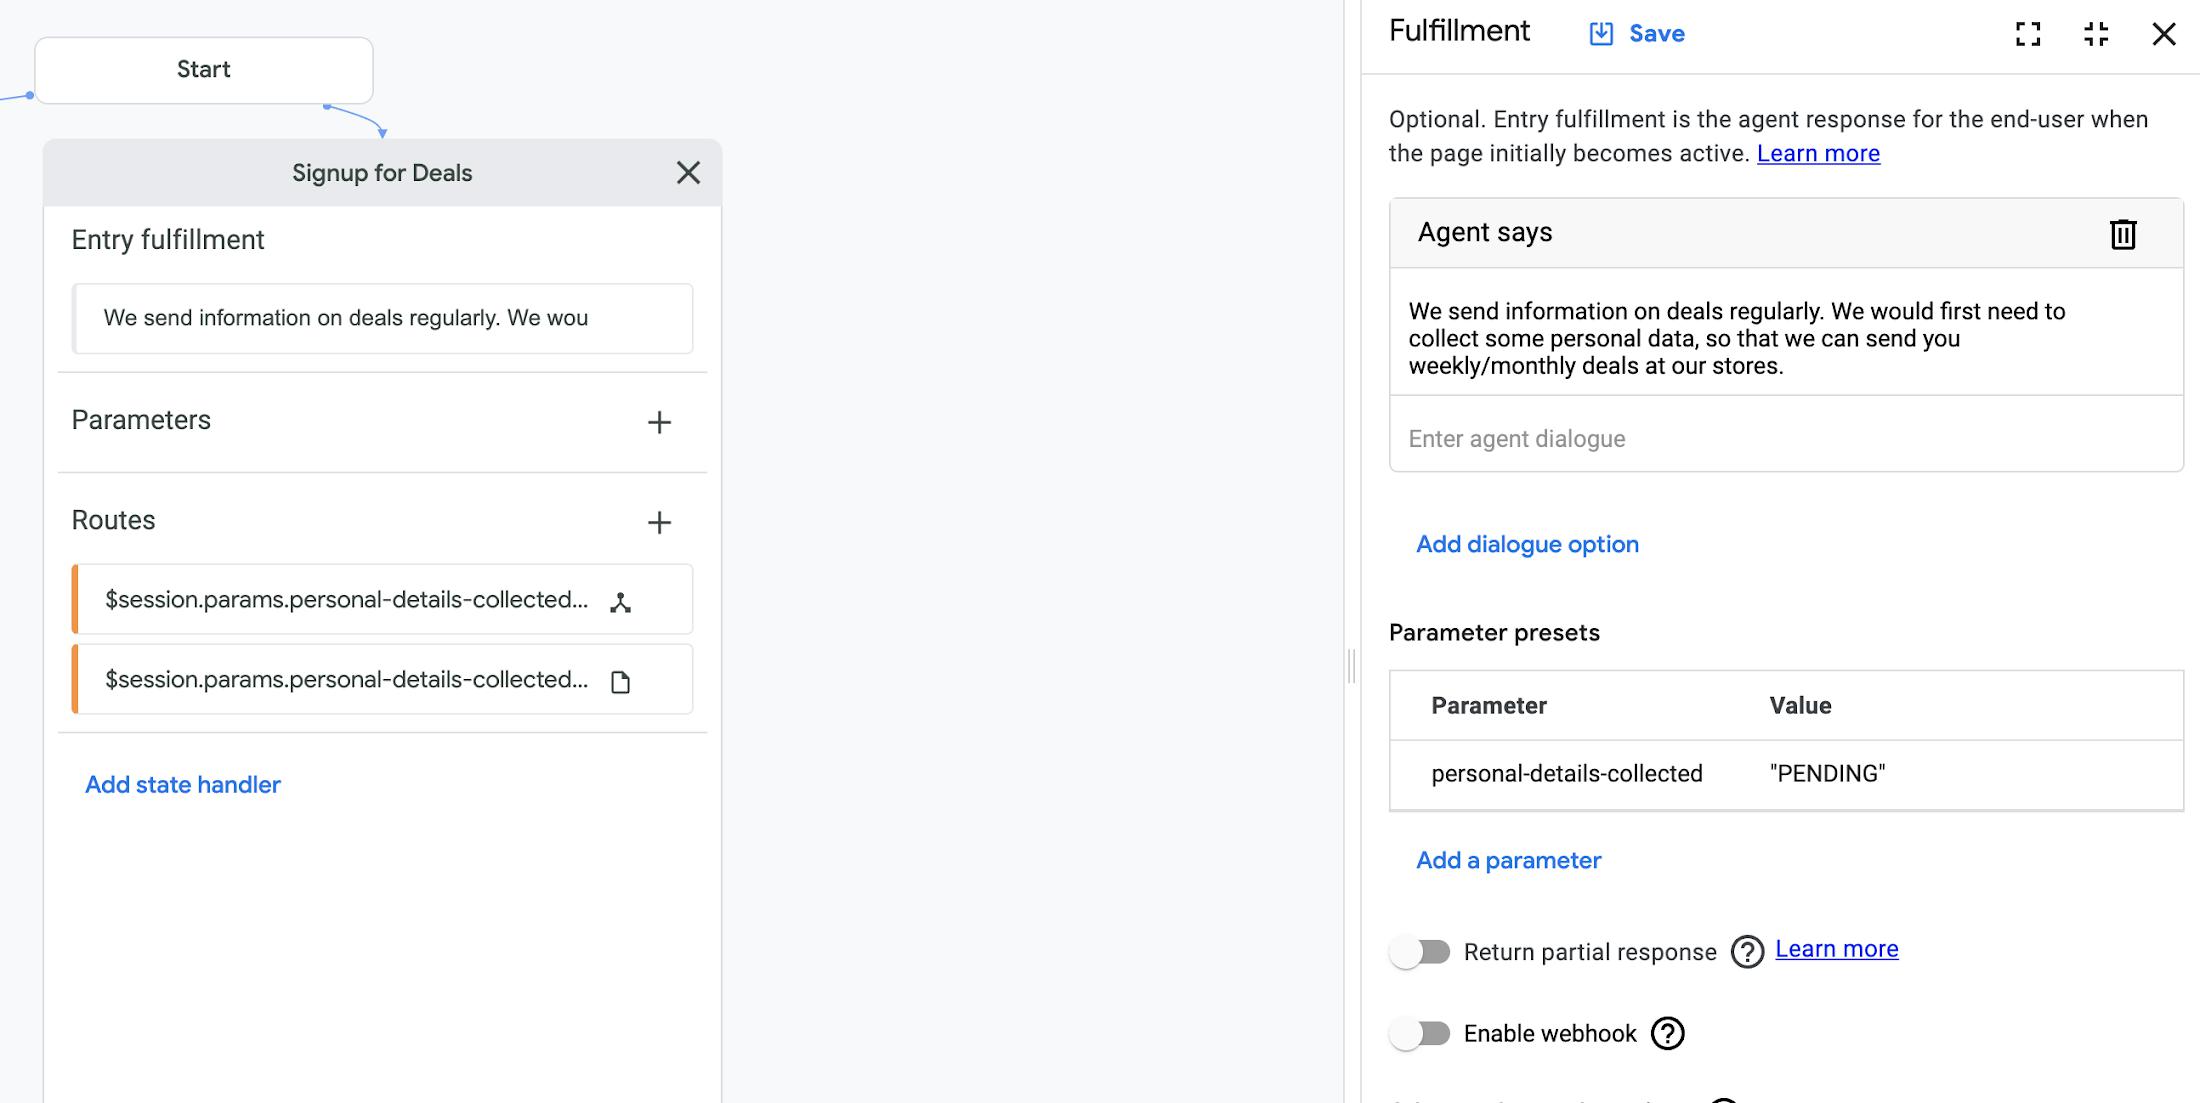
Once we return from the subflow, there are two routes for this page as given below:


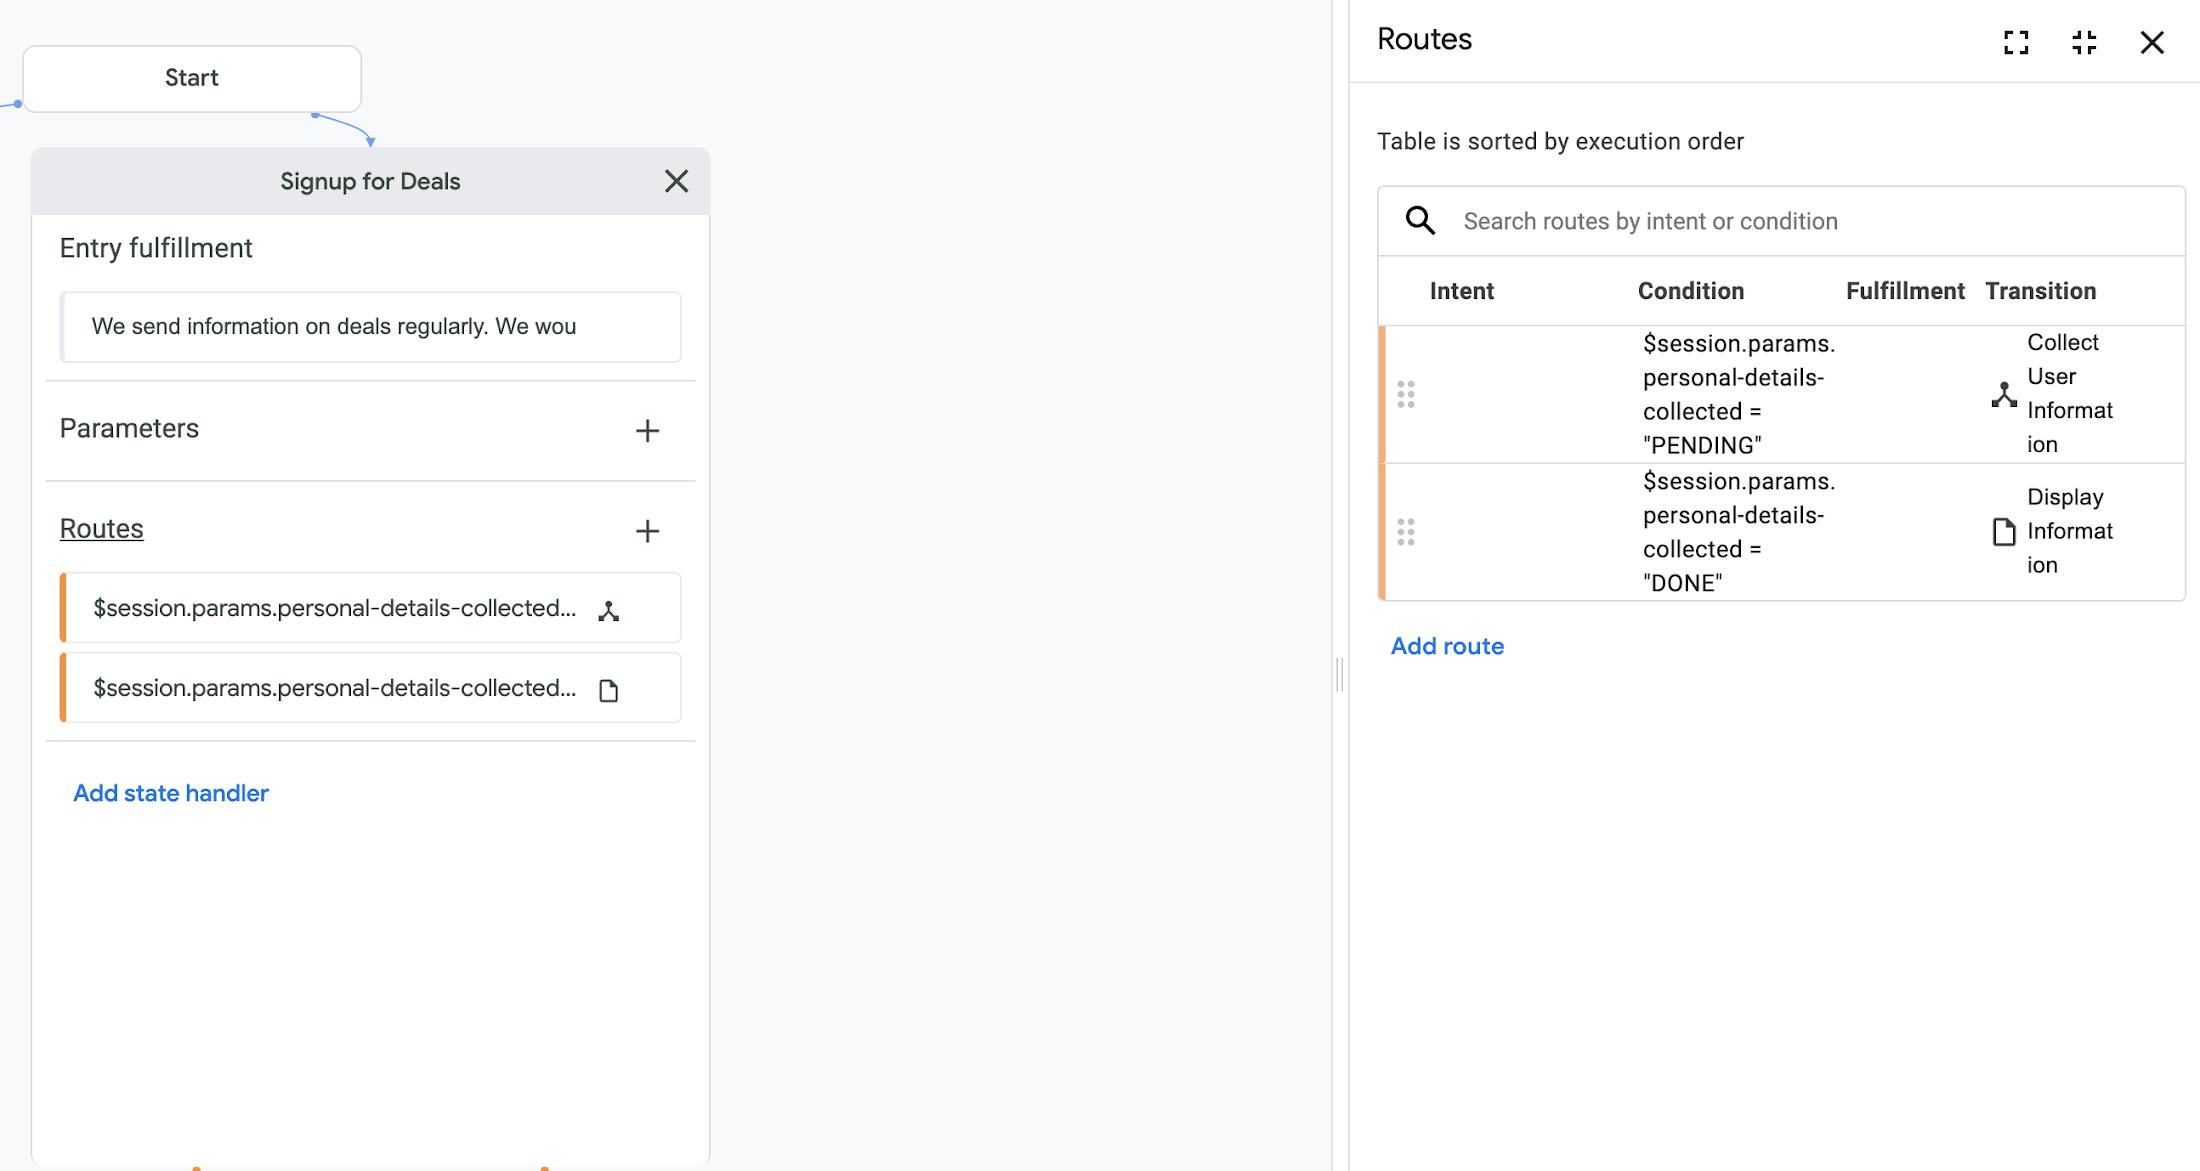
One of them goes forward to the Display Information Page if the parameters are collected. The other one again routes to the same same subflow: Collect User Information Flow. The latter should ideally not come up since in our example, we have made all the parameters for the user to be mandatory. But in case, you did not have them mandatory and had to check in the parent flow, if the parameters were provided, going back to the Subflow would have made more appropriate vis-a-vis the user experience.

Read More  Skaffold V2 GA: Further Enhancing Developer Productivity

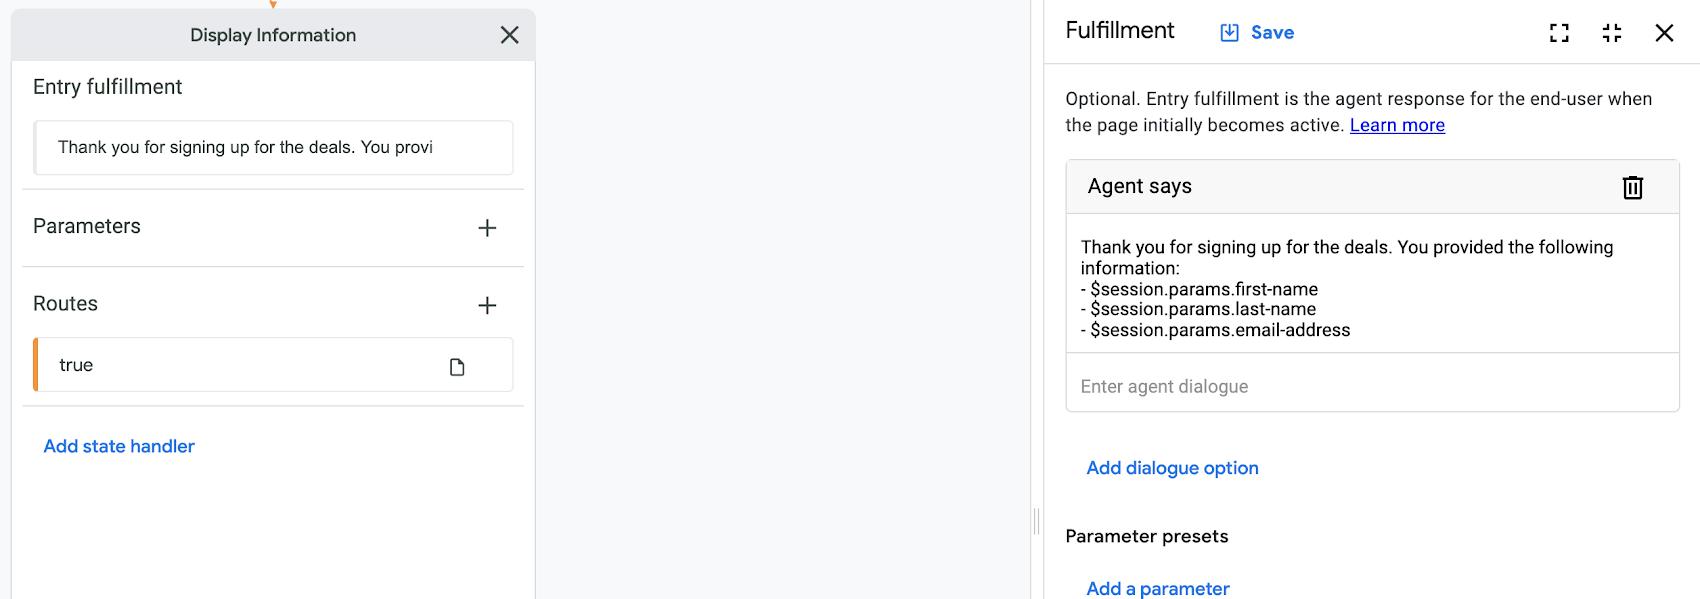
Finally, we have the Display Information Page, which simply captures the parameter values from the session and displays them. This is more of a check at this point to help us understand that the subflow was integrated and is working well.
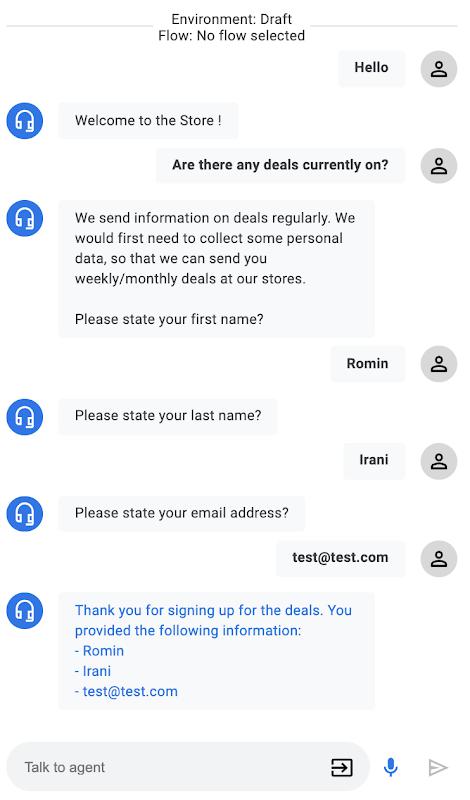
 

Test the Agent

A sample Test Run of the Agent is shown below, where we exercise the route that will invoke the Capture User Information subflow. The parameters captured in that flow are then read back as session parameters in the parent flow and displayed.


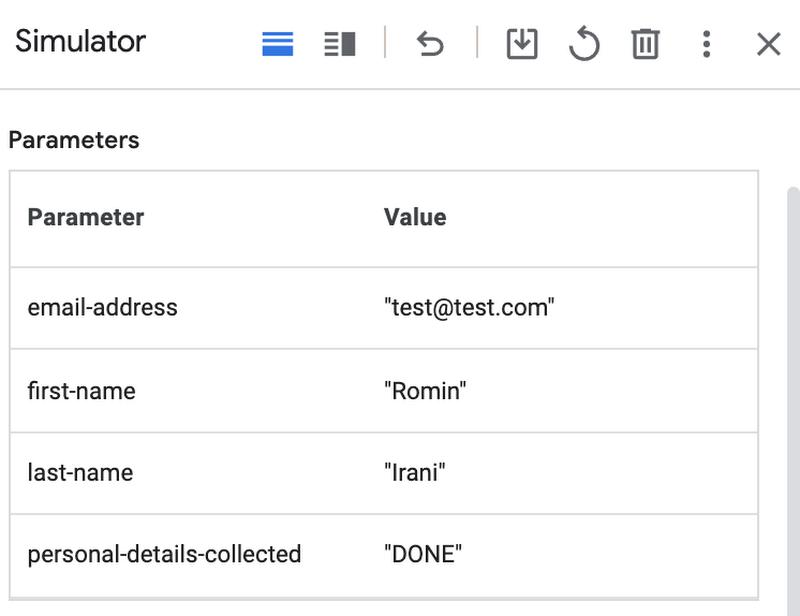
During the Test Run, be sure to check out the Parameters section as shown below. The parameters get populated accordingly and is a good way to check during the development process if everything is going as expected.


Reusing subflows is an important aspect to ensure that you are able to capture common functionality and then reuse it across Agents. This will ease the development of Agents that are complex and where multiple teams are responsible for different flows of the Agent.

Feel free to reach out to me on Twitter @iRomin for any questions or feedback.

References

  • Sample Agent File
  • Dialogflow CX Documentation
  • Dialogflow CX Flows


By: Romin Irani (Developer Advocate)
Source: Google Cloud Blog


For enquiries, product placements, sponsorships, and collaborations, connect with us at [email protected]. We'd love to hear from you!

Our humans need coffee too! Your support is highly appreciated, thank you!

aster.cloud

Related Topics
  • Dialogflow
  • Dialogflow CX
  • Google Cloud
  • Subflow
  • Tutorial
You May Also Like
Points, Lines and a Question
View Post
  • Architecture
  • Design
  • Engineering
  • People

What Is The Point In Making Points?

  • November 26, 2025
View Post
  • Software Engineering

Embedded Swift Improvements Coming in Swift 6.3

  • November 22, 2025
Visual Studio Code
View Post
  • Software Engineering

Visual Studio 2026 is here: faster, smarter, and a hit with early adopters

  • November 12, 2025
View Post
  • Software Engineering

Introducing Google Gen AI .NET SDK

  • October 24, 2025
View Post
  • Software Engineering

Julia 1.12 Highlights

  • October 13, 2025
View Post
  • Engineering
  • Software Engineering

Development gets better with Age

  • October 9, 2025
View Post
  • Software Engineering

The Growth of the Swift Server Ecosystem

  • September 27, 2025
men with computer website information and chat bubbles vector illustration
View Post
  • Software
  • Software Engineering

What is an ISV (independent software vendor)?

  • August 27, 2025

Stay Connected!
LATEST
  • 1
    Expectations vs. Reality: The AI We Thought We’d Have in 10 Years
    • June 19, 2026
  • digital-nomad-freelancer-worker-2151205464 2
    One paperwork problem – Get your Digital Nomad Visa employment documents fast from UK, EU or Singapore
    • June 16, 2026
  • 3
    Samsung Art Store Brings Art Basel to Homes Worldwide With New Curated Collection
    • June 15, 2026
  • 4
    You Do Not Need to Invest in the IPO of SpaceX, Anthropic, and OpenAI
    • June 10, 2026
  • 5
    The consequences of relying on AI for accurate news
    • June 10, 2026
  • 6
    Connecting AI agents with unstructured data using Google Cloud Storage MCP Servers
    • June 10, 2026
  • 7
    WWDC26: Apple unveils next generation of Apple Intelligence, Siri AI, powerful parental controls, and an expansive set of software improvements
    • June 8, 2026
  • 8
    IBM and Google Cloud Announce Strategic Partnership to Scale AI with Human Expertise and AI‑Powered Delivery
    • June 4, 2026
  • Data center 9
    Data Sovereignty in Spain. It’s Not Just About the Law, It’s About Efficiency
    • June 3, 2026
  • 10
    Ink vs Pixels. What you miss versus what you are actually missing.
    • June 1, 2026
about
Hello World!

We are aster.cloud. We’re created by programmers for programmers.

Our site aims to provide guides, programming tips, reviews, and interesting materials for tech people and those who want to learn in general.

We would like to hear from you.

If you have any feedback, enquiries, or sponsorship request, kindly reach out to us at:

[email protected]
Most Popular
  • 1
    Banks race to patch new cyber vulnerabilities, and other cybersecurity news
    • May 25, 2026
  • pope-leo-xiv-cq5dam-1500.844 2
    Pope Leo XIV to Publish First Encyclical on Artificial Intelligence and Human Dignity on 25 May
    • May 22, 2026
  • 3
    Portfolio to Clients, and is Strengthened by Ongoing Project Glasswing Work
    • May 20, 2026
  • reMarkable Paper Pure 4
    Everything The reMarkable Paper Pure Actually Does
    • May 14, 2026
  • 5
    Scaling cloud and AI: Microsoft Azure’s commitment to Europe’s digital future
    • May 11, 2026
  • /
  • Technology
  • Tools
  • About
  • Contact Us

Input your search keywords and press Enter.